

How To Fix The File Alignment Revit
Six More Revit File Mistakes and How to Gear up Them
By Maria Montgomery and Jason Diamond for Autodesk Academy
In Six Revit File Mistakes and How to Ready Them, nosotros explain that a healthy Revit model is important for saving time, maintaining consistency, and facilitating teamwork. In this sequel article, nosotros're featuring half dozen more Revit file mistakes and how to fix them. Let's dive in.
Want to share your knowledge?
Write an commodity for AU
ane. Do Non Allow Warnings Accumulate
Problem
Excessive amount of warnings will increase open and salve times. At some point, the file will become decadent.
Tips
- To streamline the process of resolving warnings, ready keyboard shortcuts for Review Warnings (RW) and Select by ID (RE) commands. Export the warnings to HTML file for piece of cake copy and paste of the element IDs.

Solution
Resolving warnings should be a squad endeavor. Make time to resolve warnings, even if for simply an 60 minutes each week. Know how and why warnings happen so y'all can avoid creating them if possible.
Follow these steps:
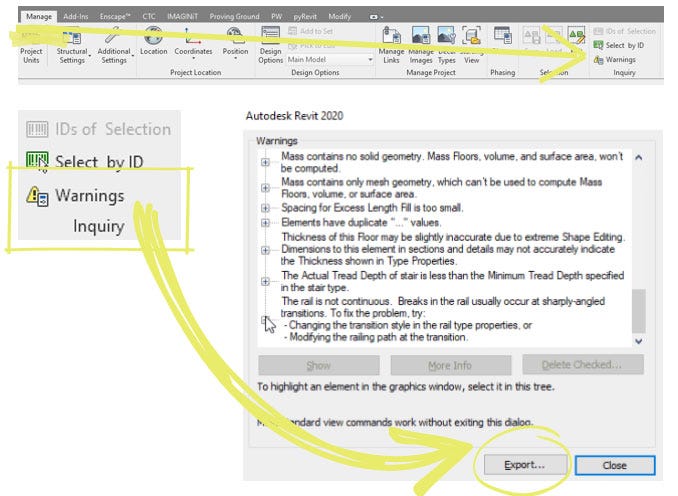
1. Select Manage > Open Warnings Dialog
2. Export warnings to HTML file
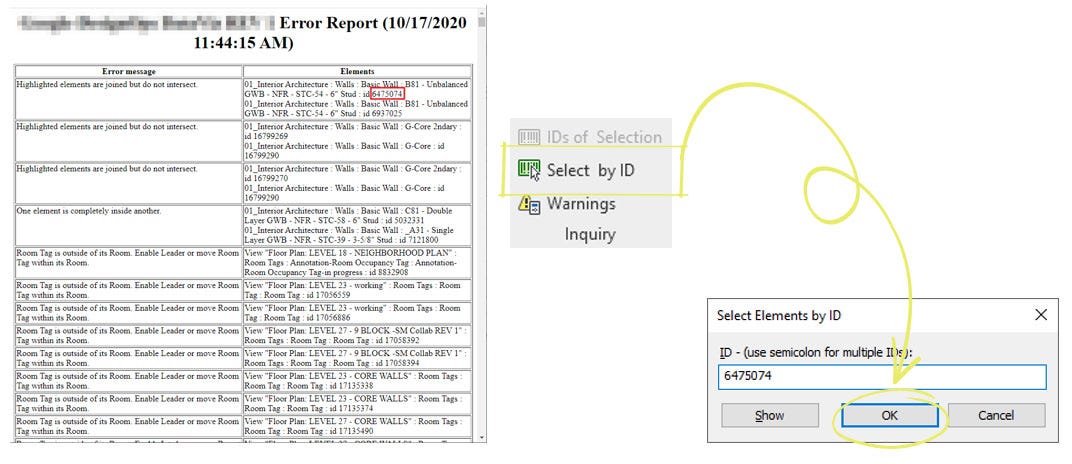
3. Open HTML warnings report
iv. Cull a alarm to resolve. Double click the chemical element ID number to select, and so copy to clipboard.
5. In Revit, click on the select by ID command (Manage tab > Research panel).
six. Paste the element ID and click OK. This selects the element.
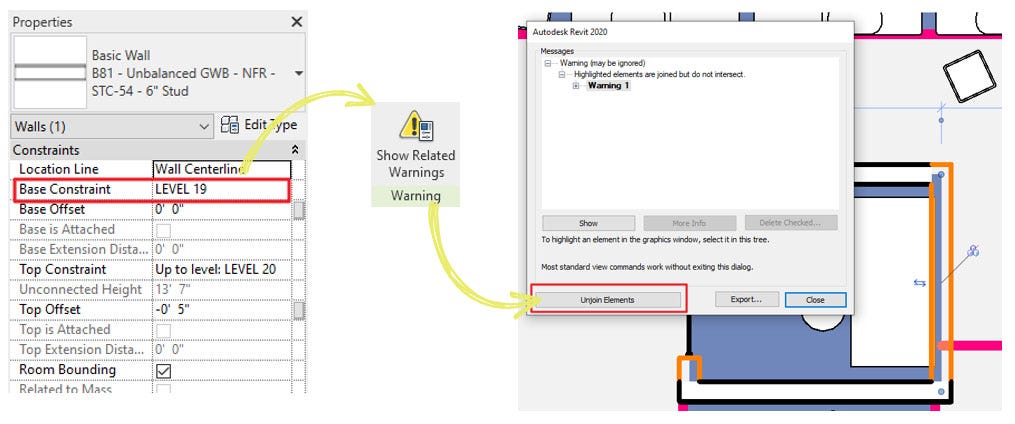
vii. To locate the element, apply the hosted level listed in backdrop. Open a plan view on that level to detect where the selected element is.
viii. With the element selected and located on the plan, click the Show Related Warnings button. This warnings dialog will only show the ii elements in conflict, and in that location is a convenient button to 'Unjoin Elements' which will go rid of the warning.
The next type of warning is a room tag exterior of its room. These are the quick and piece of cake warnings to resolve. Getting rid of these will not take much time.
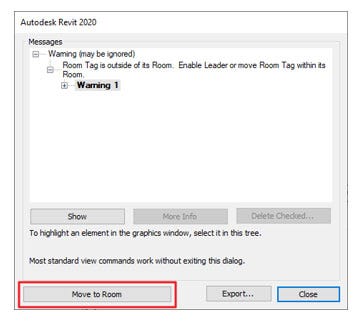
Warnings involving unenclosed rooms should be a high-priority for ii reasons. These warnings will slow down the file more than than other warning types because information technology tin can't compute the area. Also, not having an accurate area for the rooms will cause errors in your documentation, such every bit room tags not being able to display the area and errors in life safety calculations.

When you lot locate the room, there are typically ii possible solutions. One solution could be a missing room separation boundary. Adding the missing boundary will resolve the alert. The other solution is one of the rooms is no longer needed and tin exist deleted. Either way, you should inspect the problem closely to make up one's mind the appropriate solution.
2. Practise Not Update View Ranges Freely
Problem
Updating the view range volition touch the overall plan, and in most cases will crusade another problem in a different surface area of the plan.
Tips
- This is ordinarily a problem when attempting to view objects at a different height other than the cut plane that is used for the rest of the view, such as the furniture located at the bottom/peak level of a tiered auditorium.
- It is important to empathise view range extents.
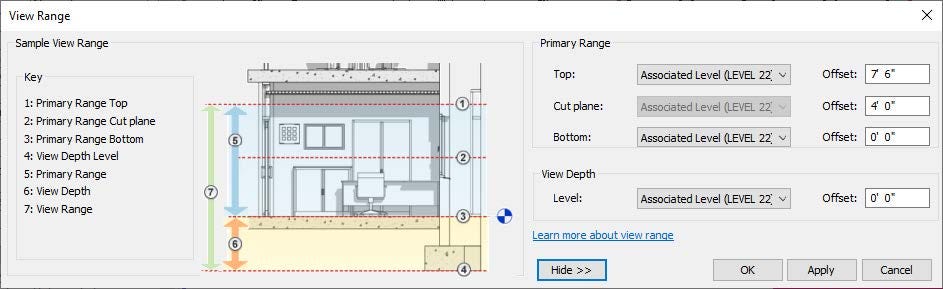
Solution
If a specific portion of the plan is deeper than the rest of the floor merely needs to be seen properly on the drawings, endeavour to continue the default view range settings and apply a Plan Region in the surface area of the view where the view range needs to be inverse.
Notes
- Exist aware that Plan Regions are view-specific and volition need to be copied to other programme views. Utilize the Paste Align > Current View command for the other plan views that need the plan region.
- When Plan Regions are copied, they will maintain their settings from the previous view until manually updated if needed.
- The Plan Region outlines volition export and print if they are visible in a view. Once the Programme Region is placed where desired, you can hide the Plan Region in view, which will hibernate the outline but non alter the view depth assigned within that Programme Region.
- Two different plan regions cannot overlap one another.
three. Practise Not Move 3D Extents of Column Grids
Problem
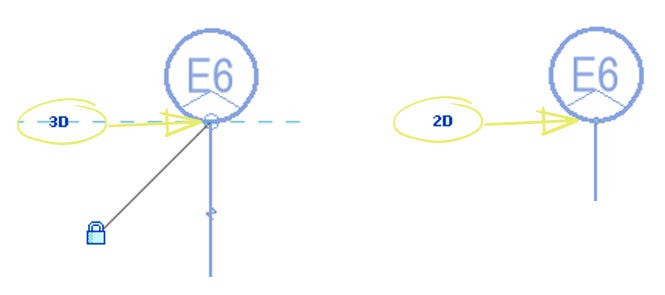
Moving the 3D extents of grids in plans or sections can cause those grids to not testify upwardly in other views. Grids are considered datum elements in Revit, along with Levels and Reference Planes. They are essentially planes slicing through the model. They have 2D extents which can exist changed per view. The 3D extents are accented and should be fix at the beginning of the project, and usually not moved over again.
Tips
- When the filigree is selected, it displays 3D extents with '3D' near the filigree endpoint which is a hollow blue dot. If the grid is set to 2D information technology will display '2D' near the grid endpoint with a smaller solid blueish dot.
- Use telescopic boxes to command extents, levels, and reference planes.
Solution
If the 3D extents accept been moved incorrectly, set them so they are showing in the necessary views. Toggle to 2d extents if you want to modify it for a sure view. When moving a column grid bubble in a plan, section or tiptop, switch to 2D extents prior to moving the bubble. The second extents controls the visual display of the line itself in that view only. Moving the cavalcade filigree bubble while in 3D extents volition update the location of that bubble throughout the entire project.
four. Exercise Not Highlight and Move the Entire Top Tag in Plan
Trouble
Moving the entire elevation tag (circle and triangle) also moves the cut plane for the top, causing the view to brandish incorrectly.
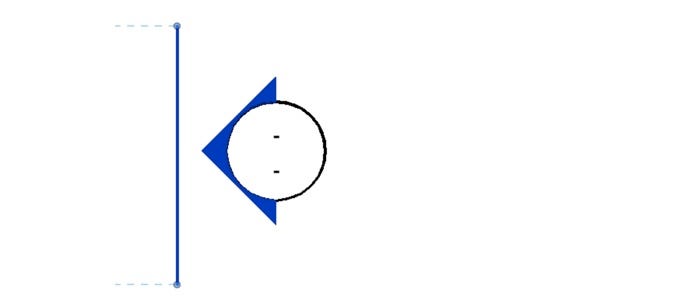
Solution
Just select the circle But and move information technology. The triangle will come with it but your original elevation cut plane stays intact.
5. Do Not Go on to Place a Family You lot Cannot See in View
Problem
Multiple instances of the aforementioned family get placed in an area because a view setting was causing the family not to brandish, and the user kept clicking in the hopes that it would somewhen display subsequently many attempts.
Tips
- When you run into this box, stop clicking.
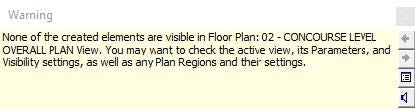
Solution
First, stop clicking. 2d, investigate why this chemical element is not showing in the view. Check your active workset and confirm that workset is open up in your Revit file.
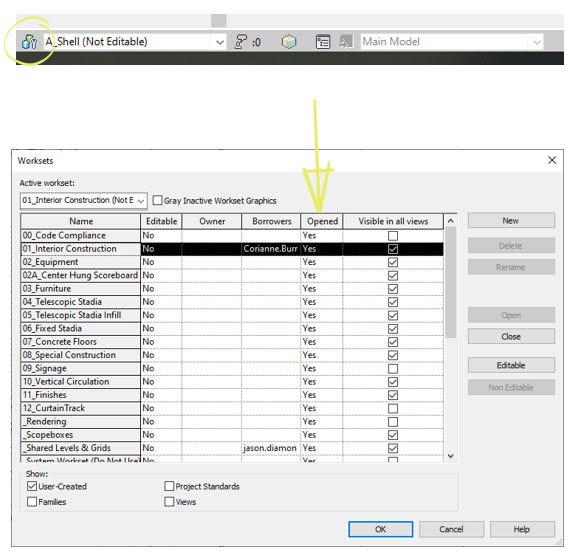
Ostend that workset is visible in the view y'all are working in past checking Visibility/Graphics.
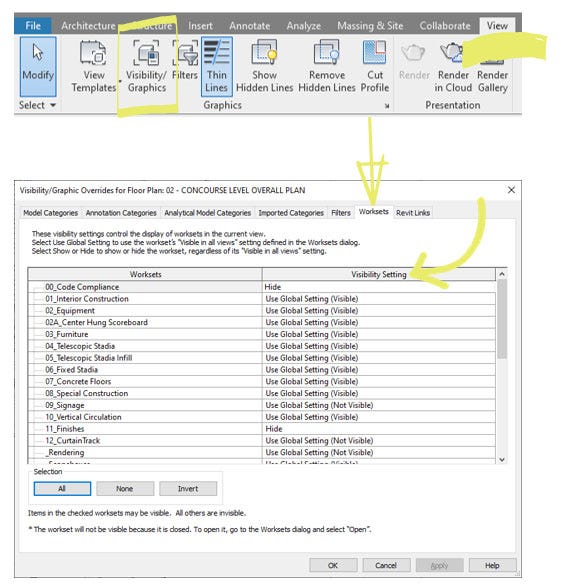
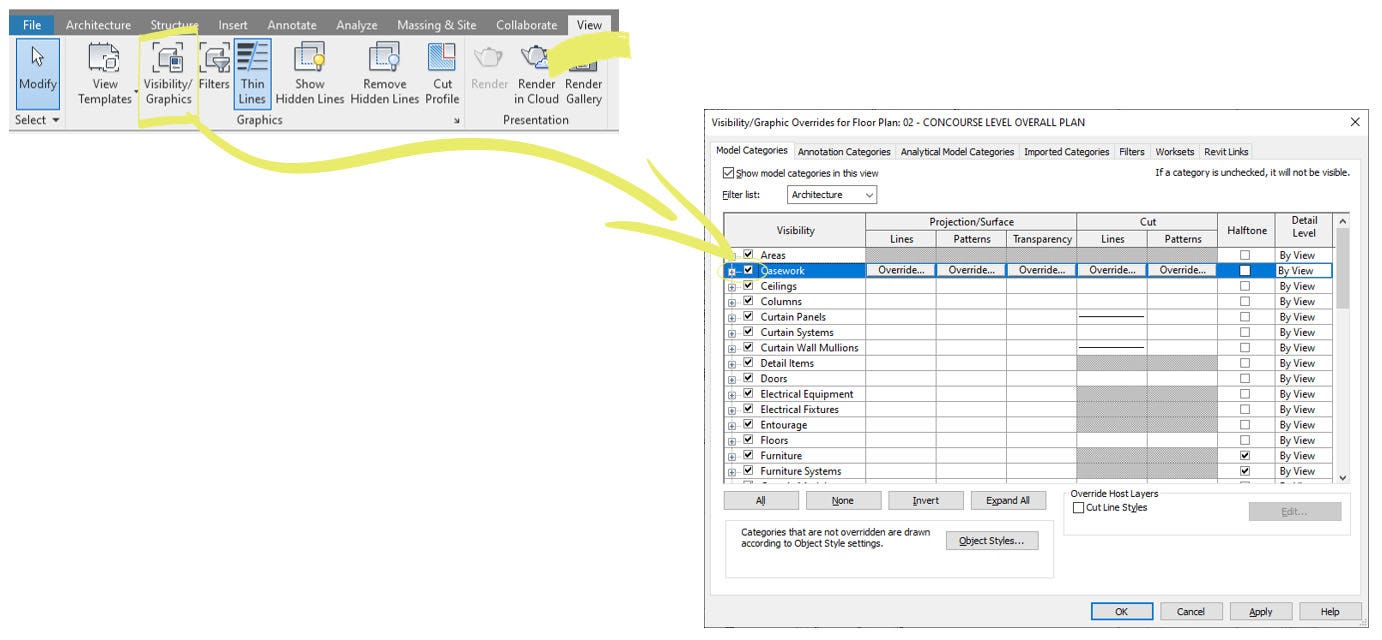
Then check the category of the element y'all are trying to place. If you were trying to identify a Casework family, cheque Visibility/Graphics to see if the Casework category is turned on.
Notes
90% of the time:
- Category or Workset is the cause
10% of the time:
- Phasing settings: check the Phase Filter of the view
- View filters in Visibility/Graphics
- Element is placed exterior of the view range of the view (higher than the cut plane or lower than the bottom aeroplane); await at a section view of the expanse
six. Do Not Delete Lines/Elements from Families You Don't Want to See
Trouble
There are times yous have a specific line or element embedded in a family that you lot do not desire to see in your Revit view. Your outset thought may be to just delete that line or element but that could potentially cause an event after down the line. Maybe you delete important clearance annotation, a reference plane or even a function of the family unit that will not be missing in a rendering.
Tips
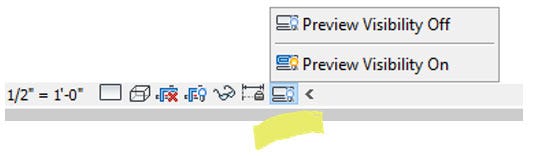
- It is sometimes difficult to perceive what you volition and volition not see once y'all bring the family into the Revit file. The Preview Visibility Tool within the family will give you the opportunity to run across what you will see in the Revit file.
Solution
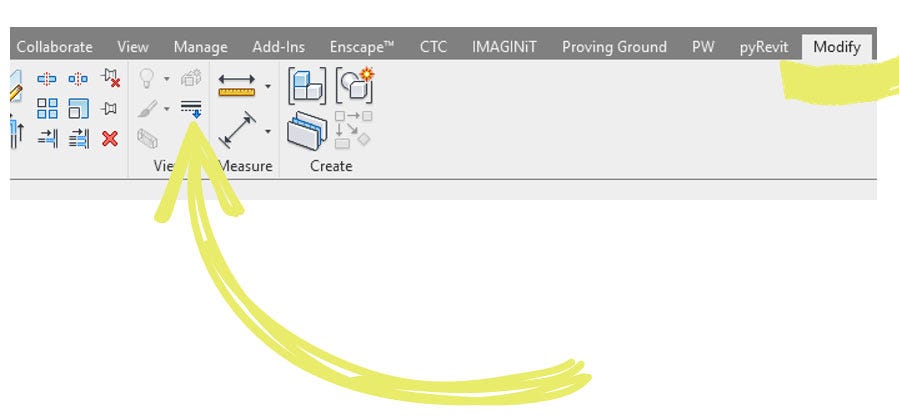
You can use the Linework tool within your Revit file that overrides the line mode for a selected line in an active view only.
You tin can update the visible settings within the family unit, which could make the line/chemical element visible or not throughout the entire Revit project.

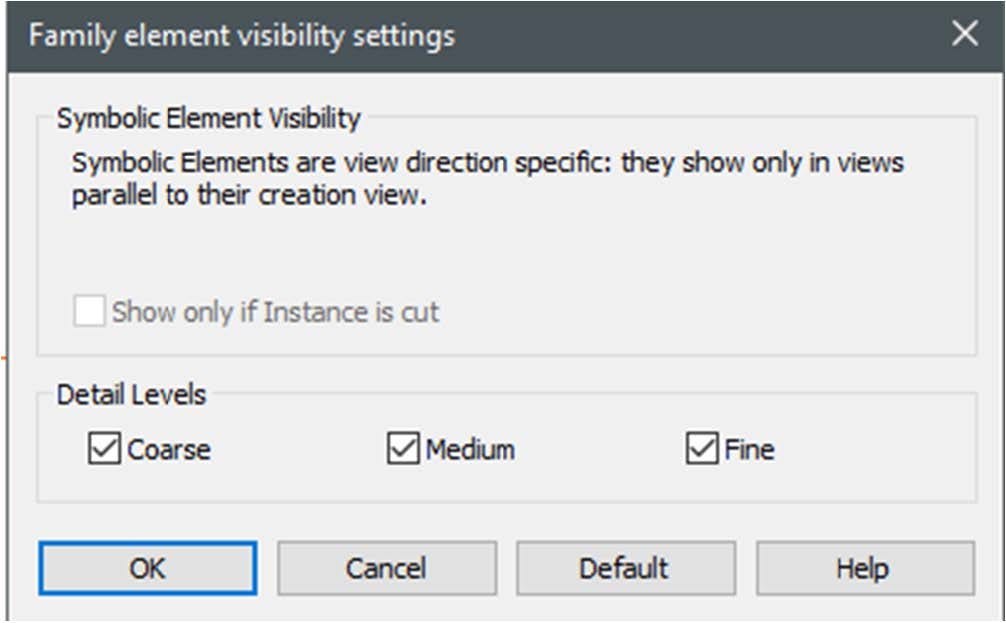
You tin update the visibility/graphics overrides inside the family unit, which tin command the visibility of the line/element depending on the detail level of the view for symbolic elements.

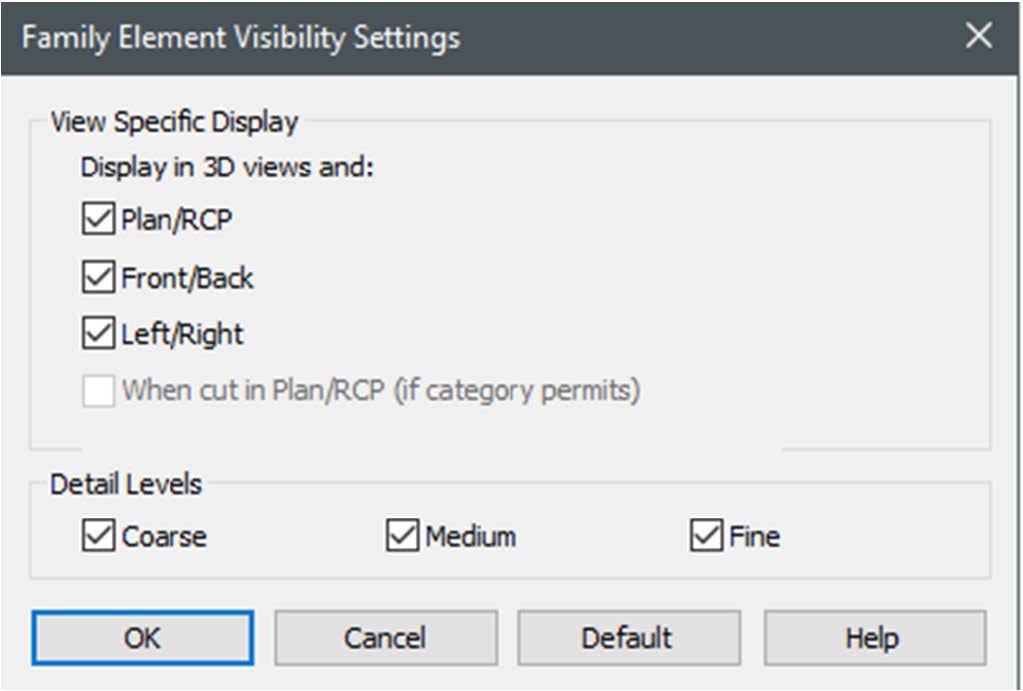
With modeled elements, you can control the visibility depending on the detail level of the view and the view type (plan/rcp, section, elevation).
Summary
Nosotros promise this article helps you toward a ameliorate understanding of what it ways to have a healthy Revit model and how to achieve such an efficient file. You tin can accept these strategies, remedies, and learning aids back to your office to share with your teams.
Larn more with the total course.
Later on receiving her undergraduate caste in Architecture from Clemson University and master's caste in Architecture from the University of Tennessee, Maria Pull a fast one on Montgomery joined the Atlanta office of Perkins&Will in 2014 as an integral function of the architectural team. While specializing in college education and laboratory design, she has contributed to a wide range of project types. In addition to her function as project architect, she besides serves as a BIM manager and sustainability manager for many of the projects she works on. She held a major part in the success of a 150,000-square-human foot university science building being awarded LEED Platinum. Along with being a USGBC LEED Accredited Professional in Building Pattern+Construction, she is a Design Engineering Leader and the only WELL Accredited Professional in the Atlanta Perkins&Volition office. With Maria'southward attending to detail, constant striving to learn, and outgoing personality, she brings a memorable free energy to all projects she works on and presentations she gives.
Jason Diamond is a design applications manager for the Atlanta office of Perkins&Volition, where he focuses on integrating workflows on large-calibration architectural and urban design projects that leverage the power of computational pattern and advanced modeling techniques. He has taught numerous Revit training courses at the beginner, intermediate, and advanced user levels. Jason is a licensed architect and has worked in BIM direction and project architect roles across a wide array of project types, and has over 20 years of experience in the AEC industry.

How To Fix The File Alignment Revit,
Source: https://medium.com/autodesk-university/more-revit-file-mistakes-and-how-to-fix-them-9a7afae5db15
Posted by: southanduke42.blogspot.com
0 Response to "How To Fix The File Alignment Revit"
Post a Comment